Note
Go to the end to download the full example code.
Generate a ProbeGroup
This example shows how to assemble several Probe objects into a ProbeGroup object.
Import
import numpy as np
import matplotlib.pyplot as plt

from probeinterface import Probe, ProbeGroup
from probeinterface.plotting import plot_probegroup
from probeinterface import generate_dummy_probe
Generate 2 dummy Probe objects with the utils function:
probe0 = generate_dummy_probe(elec_shapes='square')
probe1 = generate_dummy_probe(elec_shapes='circle')
probe1.move([250, -90])
Let’s create a ProbeGroup and add the Probe objects into it:
probegroup = ProbeGroup()
probegroup.add_probe(probe0)
probegroup.add_probe(probe1)

print('probe0.get_contact_count()', probe0.get_contact_count())
print('probe1.get_contact_count()', probe1.get_contact_count())
print('probegroup.get_contact_count()', probegroup.get_contact_count())
probe0.get_contact_count() 32
probe1.get_contact_count() 32
probegroup.get_contact_count() 64
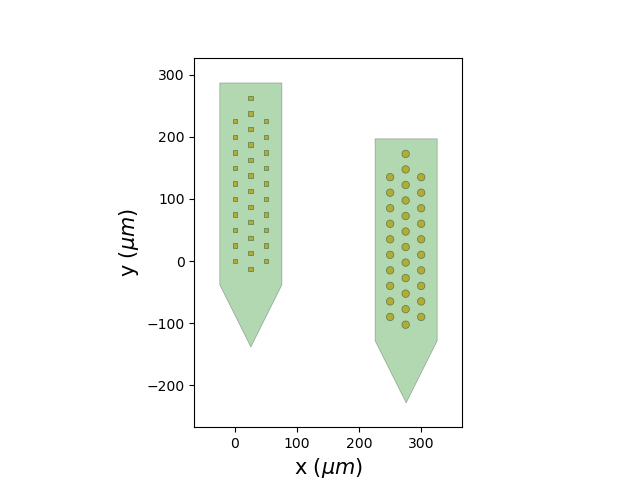
We can now plot all probes in the same axis:
plot_probegroup(probegroup, same_axes=True)
or in separate axes:
plot_probegroup(probegroup, same_axes=False, with_contact_id=True)

Identifying probes with a probe_id
Each probe in a ProbeGroup can be given a human-readable probe_id when
it is added. This is handy to keep track of which probe targets which brain
area or hemisphere. If no probe_id is given, a default one
("probe_1", "probe_2", …) is generated automatically.
probe0 = generate_dummy_probe(elec_shapes='square')
probe1 = generate_dummy_probe(elec_shapes='circle')
probe1.move([250, -90])

probegroup = ProbeGroup()
probegroup.add_probe(probe0, probe_id="left_hemisphere")
probegroup.add_probe(probe1, probe_id="right_hemisphere")

print(probegroup)
print("probe_ids:", probegroup.probe_ids)
ProbeGroup: 2 probes - 64 contacts
probe_ids: ['left_hemisphere', 'right_hemisphere']
ProbeGroup.select_probes() returns a new ProbeGroup with a sub-selection of probes given by probe_ids.
left_hemisphere_probe = probegroup.select_probes(probe_ids=["left_hemisphere"])
print(left_hemisphere_probe)
ProbeGroup: 1 probes - 32 contacts
We can also select by specific contacts from a probegroup with the
select_contacts function. Note that if contact_ids are not
unique across probes, you need to disambiguate the selection by specifying the
probe_ids as well. Otherwise, a ValueError is raised.
# check if any contact_id is not unique across probes
contact_ids = probegroup.get_global_contact_ids()
if len(contact_ids) != len(set(contact_ids)):
    print("contact_ids are not unique across probes, you should provide probe_ids to disambiguate")
contact_ids are not unique across probes, you should provide probe_ids to disambiguate
Because the contact ids are not unique across probes, combining contact_ids
with probe_ids lets us pull specific contacts from a single hemisphere:
left_probegroup = probegroup.select_contacts(
    contact_ids=["0", "1", "2"],
    probe_ids=["left_hemisphere", "left_hemisphere", "left_hemisphere"]
)
print(left_probegroup)

# Now select contacts from both hemispheres by providing the corresponding probe_ids for each contact_id:
left_and_right_probegroup = probegroup.select_contacts(
    contact_ids=["0", "1", "2"],
    probe_ids=["left_hemisphere", "right_hemisphere", "left_hemisphere"]
)
print(left_and_right_probegroup)

# Without providing probe_ids, the selection is ambiguous and an error is raised:
try:
    ambiguous_selection = probegroup.select_contacts(contact_ids=["0", "1", "2"])
except ValueError as e:
    print("Error raised for ambiguous selection:", e)

plt.show()
ProbeGroup: 1 probes - 3 contacts
ProbeGroup: 2 probes - 3 contacts (with custom global contact order)
Error raised for ambiguous selection: Some contact ids are ambiguous because they live on multiple probes; pass probe_ids to disambiguate which probe each belongs to:
"0" lives on probes ['left_hemisphere', 'right_hemisphere']
"1" lives on probes ['left_hemisphere', 'right_hemisphere']
"2" lives on probes ['left_hemisphere', 'right_hemisphere']
Total running time of the script: (0 minutes 0.207 seconds)